Struggling to wrap text around images in PowerPoint? This is a common challenge for many users. Text wrapping can help optimize slide space and increase visual appeal of your presentations.
Our comprehensive guide will walk you through the steps on how to wrap text in PowerPoint effectively, giving your slides a professional touch. Ready to unveil the secrets of perfect text wrapping? Let’s dive straight in!
Key Takeaways
- Text wrapping in PowerPoint saves space on slides and allows for more content to be included without clutter.
- It enhances the visual appeal of presentations by neatly wrapping text around objects like images or shapes.
- Different methods to wrap text in PowerPoint include manually inserting spaces, using text boxes, and importing already wrapped text from Word.

Understand the Importance of Text Wrapping in PowerPoint
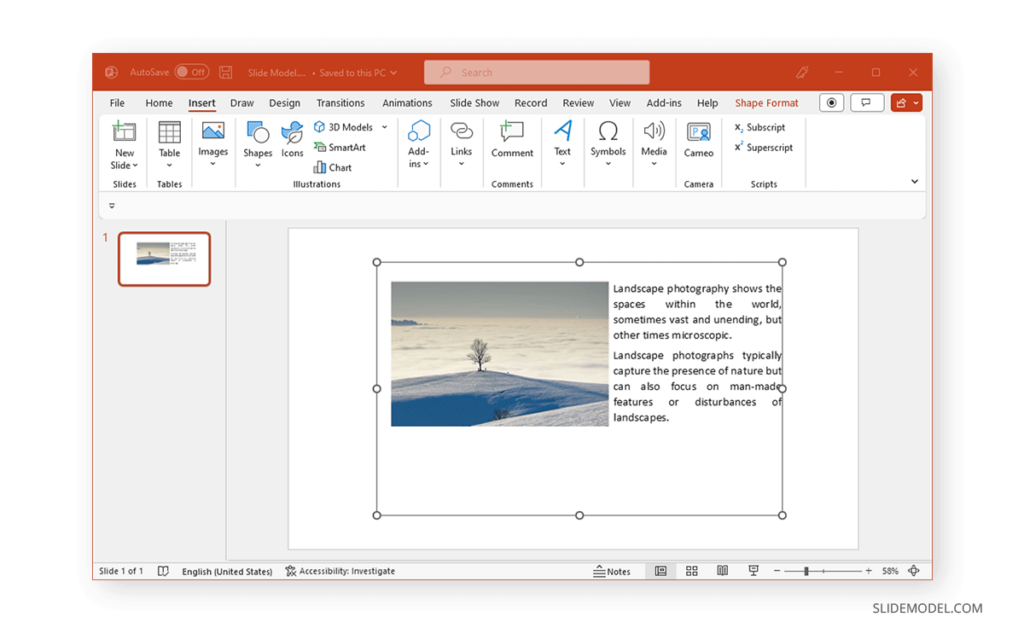
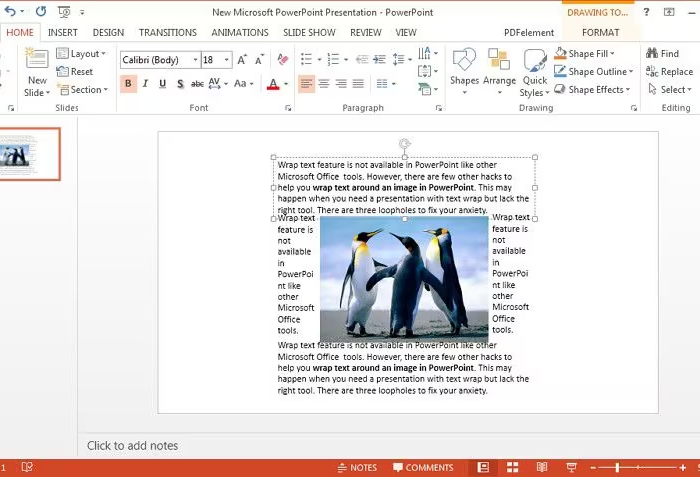
Text wrapping in PowerPoint is essential for several reasons. It saves space on slides, allowing for more content to be included. Additionally, it enhances the visual appeal of presentations by allowing text to neatly wrap around objects, such as images or shapes.
Saves space on slides
Text wrapping in PowerPoint is a practical feature that helps conserve space on your slides. With this function, instead of having text and images each occupy their areas separately, they can coexist harmoniously on the same plane.
You can fill every corner with relevant information without creating clutter or overcrowding. It also gives slides a more streamlined look, making your presentation aesthetically pleasing without compromising its content density.
Allows for more content
In a PowerPoint presentation, text wrapping enhances the amount of content you can include without cluttering your slides. It provides more options for effective text management and layout.
You can deftly arrange your words around images, charts or other graphic elements using this feature.
Text wrapping in PowerPoint ensures that no space is wasted on a slide, accommodating more information within the same frame. This way, you maintain an organized and visually appealing design while delivering detailed insights to your audience.
For instance, you could wrap text around objects in PowerPoint to embed captions or descriptive details directly with graphical representation of data-points.
Enhances visual appeal
Utilizing text wrapping in PowerPoint significantly enhances the visual appeal of your presentation. A well-arranged layout, with text flowing smoothly around images or objects, draws and holds audience attention.
Text wrapping helps prevent clutter on slides by evenly distributing content so it is balanced and engaging. Additionally, it eliminates distractions making information easy to read and comprehend.
From commanding viewer focus to guiding their eye movement along the slide elements – efficient use of space through text wrapping contributes greatly toward creating visually attractive presentations.
By integrating smart design choices like these into your PowerPoint presentations, you can craft a compelling narrative that resonates with viewers while maintaining a crisp, professional look throughout.
Remember, captivating visuals not only improve audience engagement but also enhance message retention rates!

Different Methods to Wrap Text in PowerPoint
You can wrap text in PowerPoint using several different methods. One way is to manually insert spaces around objects to create a wrapping effect. Another method is to use text boxes around images, which allows you to control the placement and flow of the text.
Additionally, you can import already wrapped text from Word, saving you time and effort.
Manually insert spaces around objects
To manually insert spaces around objects in PowerPoint, follow these steps:
- Select the object that you want to wrap text around.
- Go to the Format tab in the Picture Tools or Drawing Tools group.
- Click on Wrap Text and choose the desired option, such as Square or Tight.
- Adjust the placement of the object by clicking and dragging it to a new position on the slide.
- Resize the object if needed by clicking and dragging its handles.
Use text boxes around images
Text boxes are a useful tool for wrapping text around images in PowerPoint. Here are the steps to follow:
- Select the image you want to wrap text around.
- Go to the “Insert” tab and click on “Text Box” in the “Text” group.
- Draw a text box around the image by clicking and dragging on the slide.
- Format the text box by adjusting its size, position, and other properties using the options in the “Format” tab under “Picture Tools”.
- Type or paste your text into the text box.
Import already wrapped text from Word
To wrap text in PowerPoint, you can also import already wrapped text from Word. This allows you to easily transfer content that has been formatted with text wrapping in Word and incorporate it into your PowerPoint slides seamlessly. Here is how to do it:
- Copy the text from your Word document that has already been wrapped.
- In PowerPoint, navigate to the slide where you want to import the wrapped text.
- Paste the copied text onto the slide by pressing Ctrl+V or right – clicking and selecting Paste.
- The imported text will retain its formatting and wrapping from Word.
Step-by-Step Guide: How to Wrap Text in PowerPoint
To wrap text in PowerPoint, start by creating a text box and formatting the text. Then, arrange the content using text wrapping options available in Word. Finally, adjust the Word document within your PowerPoint presentation.
This step-by-step guide will walk you through the process and help you efficiently wrap text in PowerPoint.

Create a text box and format the text
To wrap text in PowerPoint, start by creating a text box. Go to the Insert tab and click on Text Box in the Text group. A cursor will appear, allowing you to draw a rectangular shape where you want your text to be.
Once the text box is created, you can format the font style, size, color, and alignment of the text using the options available in the Home tab. Remember to resize or move the text box as needed to ensure proper placement on your slide.
Arrange content using text wrapping in Word
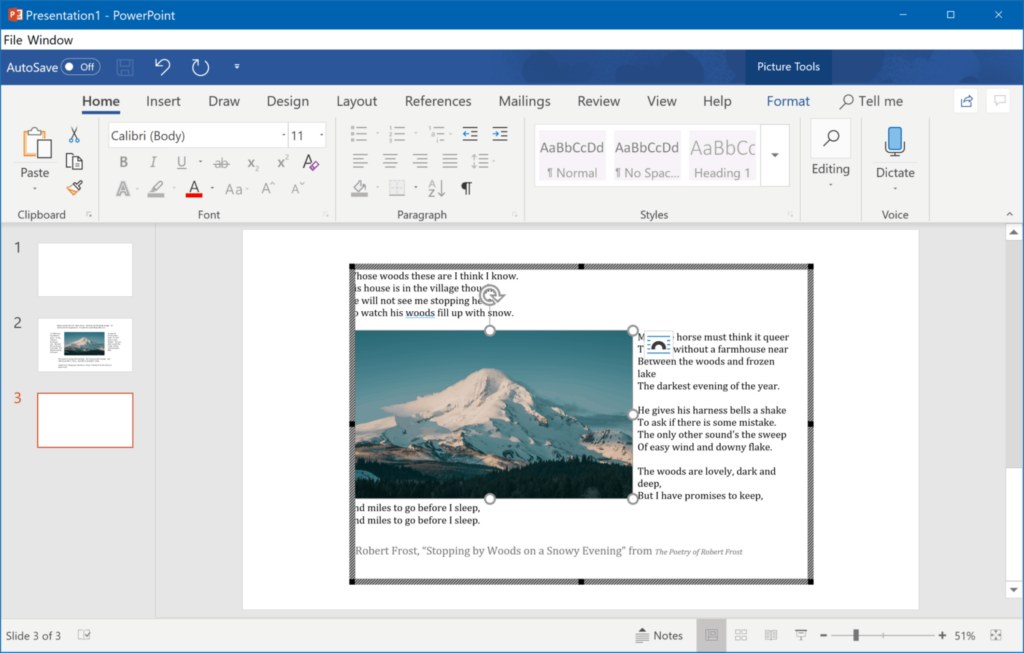
To arrange content using text wrapping in Word, follow these simple steps. First, select the object or image you want to wrap text around. Then, go to the “Format” tab and click on “Wrap Text.” Choose one of the available options such as “Square,” “Tight,” or “Behind Text.” You can also customize the wrapping by selecting the “Edit Wrap Points” option.
Once you’re done, adjust the position of the object if needed by clicking and dragging it on your document. This feature allows you to enhance visual appeal and create a more professional-looking document with neatly wrapped text around objects.
Adjust the Word document in PowerPoint
To adjust the Word document in PowerPoint, follow these simple steps. First, open the Word document that contains the wrapped text you want to import into PowerPoint. Next, select and copy the entire text from the Word document.
Then, go back to your PowerPoint presentation and navigate to the slide where you want to insert the wrapped text. Paste the copied text into a new or existing text box on that slide.
Finally, format and adjust the size of the text box as needed to fit seamlessly into your PowerPoint design. With these steps, you can easily adjust a Word document within PowerPoint for a cohesive and visually pleasing presentation layout.
Additional Creative Ideas for Text Wrapping in PowerPoint
Utilize rulers and grid lines to ensure precise placement of text around objects. Consider the use of white space for a clean and organized appearance. Take advantage of Word hyphenation to create more even wraps in your PowerPoint presentation.
Utilize rulers and grid lines
Utilize rulers and grid lines:
- Use the rulers and grid lines in PowerPoint to precisely align and position text.
- The rulers provide horizontal and vertical markers, helping you maintain consistent spacing and formatting.
- The grid lines act as a visual guide to ensure your text is aligned with other objects on the slide.
- Press “Ctrl+R” to show or hide the rulers, and go to the “View” tab, then click on “Gridlines” to toggle visibility of the grid lines.
- Adjust the spacing between text elements by dragging them along the ruler or snapping them to grid lines.
- By utilizing these tools, you can achieve a cleaner and more professional layout for your PowerPoint presentation.
Consider white space
White space refers to the empty areas or gaps between elements on a slide. When it comes to text wrapping in PowerPoint, it’s important to consider white space as it plays a crucial role in enhancing readability and visual appeal.
By leaving enough white space around your wrapped text, you create breathing room for the content, making it easier for viewers to read and understand. White space also helps create a sense of balance and organization on your slides, preventing them from appearing cluttered or overwhelming.
So when working with text wrapping in PowerPoint, don’t forget to consider the power of white space and how it can improve the overall presentation of your content.
Use Word hyphenation
To enhance the readability and flow of your text in PowerPoint, you can utilize Word hyphenation. This feature automatically breaks words into syllables at the end of lines to avoid long or awkward gaps.
To use Word hyphenation, select the text box containing your content and go to the “Format” tab. Then click on “Text Box” and check the box that says “Automatically hyphenate.” This will help ensure that your text is neatly displayed without any excessive white space or uneven line breaks.
Considerations and Best Practices for Text Wrapping in PowerPoint
Evaluate the readability and legibility of your wrapped text in PowerPoint by reviewing it from different viewing distances and angles. Test out different wrapping options to see which one works best for the content and layout of your slide.
Lastly, make sure to review your final presentation for consistent use of text wrapping throughout all slides.
Evaluate readability and legibility
To ensure that your text is easily readable and legible in PowerPoint, it’s important to evaluate the overall clarity and visual appeal. Take into consideration factors such as font size, spacing, and contrast between the text color and background.
Make sure the text is large enough for everyone to read comfortably and choose a font style that is clear and easy to understand. Additionally, check that there is adequate white space around the text to avoid cluttering the slide.
By evaluating readability and legibility in your PowerPoint presentation, you can ensure that your audience will have no trouble understanding and engaging with your content.
Test different wrapping options
Test the various wrapping options available in PowerPoint to find the best one for your presentation. Experiment with different methods and see which one works well with your content and design. Consider the following options:
- Manually insert spaces around objects to create a basic wrap.
- Use text boxes around images for more control over text placement.
- Import already wrapped text from Word for a quick and easy solution.
- Select image wrap text options in PowerPoint to adjust how text wraps around an object.
- Create text wraps within shapes to add visual interest and variety.
Review the final presentation for consistency
Reviewing the final presentation for consistency is an essential step to ensure that the text wrapping remains cohesive and visually appealing throughout. By carefully examining each slide, you can identify any inconsistencies in font sizes, alignment, or spacing.
Look out for any misplaced objects or overlapping text boxes that may disrupt the flow of the presentation. Make sure that all wrapped texts align consistently with images and shape boundaries.
Adjust as necessary to maintain a professional and polished look for your PowerPoint presentation.
Conclusion
In conclusion, mastering the art of text wrapping in PowerPoint opens up a world of possibilities for creating visually appealing and content-rich presentations. By utilizing different methods such as inserting spaces around objects or using text boxes, you can effectively wrap text to save space and enhance the overall look of your slides.
With these techniques in your arsenal, you’ll be able to take your PowerPoint skills to the next level and captivate your audience with impressive visual layouts.
Frequently Asked Questions
1. How do I wrap text in PowerPoint?
To wrap text in PowerPoint, select the text box or shape containing the text, click on the “Format” tab, and then choose “Wrap Text” from the options available.
2. Can I adjust the wrapping style of my text in PowerPoint?
Yes, you can customize the wrapping style of your text in PowerPoint by selecting the desired option from the Wrap Text menu, such as wrapping around shapes or within a specific area.
3. What happens if my text doesn’t fit within a shape or textbox?
If your text exceeds the boundaries of a shape or textbox in PowerPoint, it will automatically be truncated or hidden. Adjusting font size or resizing shapes can help accommodate longer texts.
4. Does changing fonts affect how my text wraps in PowerPoint?
No, changing fonts does not directly impact how your text wraps in PowerPoint. However, different font styles and sizes may require adjustments to ensure proper alignment and readability.
5. Can I undo wrapping changes made to my text in PowerPoint?
Yes, you can undo any wrapping changes made to your text by selecting either “None” (no wrapping) from the Wrap Text options or using Ctrl+Z shortcut to revert back to previous settings.


